This is the fourth part of a multi-part series that shows how to set up Jupyter Hub for a college class. The goal is to have a running version of Jupyter Hub that students in the class can log into when given a simple web link. In this post, we'll get to the fun stuff: installing jupyterhub on the server, installing Python packages and spinning up Jupyter Hub for the first time.
Posts in this series
- Why Jupyter Hub?
- Create SSH keys, save to documents/ssh-keys
- Create a new Digital Ocean Droplet with a non-root sudo user
- Install Jupyter Hub on the server (this post)
- Apply SSL, link a domain name to the server and configure nginx
- Connect OAuth to Jupyter Hub
- Connect to Jupyter Hub as student
The last post
In the last post, we created a new server on Digital Ocean (called a droplet) and made sure to add our public SSH key to the setup options. Then we logged into the server as root with our private SSH key. As root, we set up a new user with sudo privileges and added our public SSH key to the new users profile. Then we logged into the server as the new user and checked the new user's home directory.
This post
- Update packages on the server
- Install Anaconda
- Install Python packages and jupyterhub
- Run a very unsecured instance of Jupyter Hub just to see if it works
- Shut down Jupyter Hub very quickly because of no SSL security
1. Update Packages on the Server
It is probably best to update the packages installed on the server in case there are changes and updates to the operating system since the server was created. This is probably a reflex for those that use Linux a lot. Open PuTTY and log into the server as the non-root sudo user we created in the last post. Then update the system:
$ sudo apt-get update
2. Install Anaconda
Next we'll install Anaconda. When I installed Anaconda on Windows10, I used an msi installer. But for installation of Anaconda on the cloud server we'll use a shell script. The first time I set up Jupyter Hub, I installed Anaconda in the /opt directory. I don't think this is the best setup. When I installed Anaconda in /opt, I ended up with all sorts of permission problems when I tried to run conda and jupyterhub. For me it caused less problems to install Anaconda in the non-root user's home directory(/home/peter/). The user's home directory is also the default Anaconda3 installation location.
I followed this tutorial from Digital Ocean.
Go to https://repo.continuum.io/archive/ and look down the list of installs for the newest installer that corresponds to:
- Anaconda 3 (not Anaconda 2, we don't want legacy Python version 2.7)
- Linux
- x86
- 64 (bit)
- .sh (linux shell script)
At the time of writing, the shell script was:
Anaconda3-5.1.0-Linux-x86_64.sh
cd into the /tmp directory and download the script. Then run the script and follow the prompts.
$ cd /tmp
$ curl -O https://repo.continuum.io/archive/Anaconda3-5.1.0-Linux-x86_64.sh
$ bash Anaconda3-5.1.0-Linux-x86_64.sh
We want to be able to run conda from the command line. So make sure to allow Anaconda to append your PATH during the installation. After installation, we need to reload the .bashrc file because Anaconda made changes to .bashrc during the install (when it added conda to our PATH).
$ source ~/.bashrc
Now we should be able to run conda. Try:
$ conda --version
If you see output, that means conda was installed and can be run by the non-root user.
3. Install Python packages and jupyterhub
We have a full installation of Anaconda which includes a lot of useful packages for engineers including: numpy, pandas, matplotlib, scipy, sympy, bokeh and holoviews. Anaconda also includes other useful packages such as requests, beautiful soup and attrs. And for student who want to go further, the Anaconda distribution comes with django, flask, tk, tornado and scikit-learn.
There are a couple other packages I want to install in addition to the standard Anaconda packages. First are some extra packages useful for engineers: pint, pyserial and schemdraw.
$ conda install -c conda-forge pint
$ conda install -c anaconda pyserial
$ pip install SchemDraw
Now we'll install Jupyter Hub! Since we are using conda to install jupyterhub (rather than pip), we don't need to install node and configurable-http-proxy separately. Conda installs the non-python dependencies (like node and configurable-http-proxy) that jupyter hub relies upon.
$ conda install -c conda-forge jupyterhub
$ conda install notebook
4. Run a very unsecured instance of Jupyter Hub just to see if it works
OK let's give it a whirl. Start jupyterhub for the first time. Note the --no-ssl flag at the end. This needs to be included or you won't be able to browse to the server.
$ jupyterhub --no-ssl
You should see some output in the PuTTY window. The last line should be something like JupyterHub is now running at http://:8000/. The first time I set up Jupyter Hub, I wasn't able to see the site using a web browser. Nothing would come up and the connection would time out.

Why? It turns out Digital Ocean installs a firewall called ufw by default and turns the ufw firewall on. When the server was created, ufw was configured to only allow incoming connections on ports 22, 80 and 433. This output is shown when we first log into the server:
"ufw" has been enabled. All ports except 22 (SSH), 80 (http) and 443 (https)
have been blocked by default.
But jupyterhub runs on port 8000 - it tells us so when jupyterhub starts. So we need to configure ufw to allow connections on port 8000 (at least for now, just to see if jupyterhub works). To allow communication on port 8000 and restart jupyterhub, type:
$ sudo ufw allow 8000
$ jupyterhub --no-ssl
Now we can browse to the server IP address appended with :8000. The web address should look something like: http://165.228.68.178:8000. You can find the IP address of the server by going into the Digital Ocean dashboard. We should see:
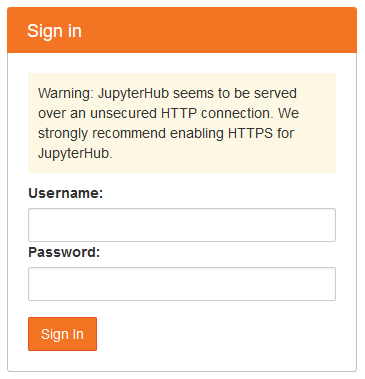
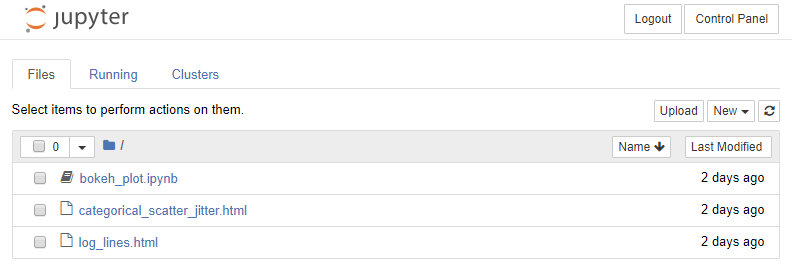
Awesome! Quick log into jupyterhub using the username and password for the non-root sudo user (in my case peter) that we set up and are using in our current PuTTY session. You should see the typical notebook file browser with all the files you can see when you run ls ~/. Try creating and running a new notebook. The notebook work just like a jupyter notebook running locally.

5. Quick! Log out and shut down jupyterhub
Quick! Log out and shut down jupyterhub. (does quick really matter in internet security?) The site is running without any ssl security over regular HTTP not HTTPS. Key in [Ctrl] + [c] to stop jupyterhub.
Summary
In this post we installed Anaconda on the server using a shell script. We added conda to our path and reloaded our .bashrc file. Then we installed some extra Python packages such as pint and pyserial. Finally we installed jupyterhub, opened up port 8000 and ran jupyterhub for the first time! Remember we shut down jupyter hub very quickly because we ran it without any SSL security.
Next Steps
In the next post we will build SSL security into our Jupyter Hub deployment and connect the server to domain name. Plus we'll customize the jupyterhub config file and install and use nginx as a proxy server.