This is the seventh part of a multi-part series that shows how to set up Jupyter Hub for a college class. In this post, we build a pre-spawn hook that creates an "assignments" and "notes" directory with pre-constructed assignments and notes for each JupyterHub user. We also build a custom login pages that looks much more like our college login page and contains helpful links.
Posts in this series
- Why Jupyter Hub?
- Create ssh key, save to documents/ssh-keys
- Create a new Digital Ocean Droplet with a non-root sudo user
- Install Jupyter Hub on the server
- Apply SSL, link a domain name to the server and configure nginx
- Connect OAuth to Jupyter Hub
- Add a custom login page and assignments directory for each user on a Jupyter Hub server (this post)
Last time
In the last post, we set JupyterHub to run as a system service in the background on our server. Then we added tried two different login systems: github and google. The github authentication system allowed user to log in with github usernames and passwords. The google authentication system allowed users to log in with their college usernames and passwords. Then we modified the jupyterhub_config.py file to all the creation of new users on the server even if the new usernames contained a dot.
Steps in this post:
- Create a repo on github.com with the assignments and notes
- Add a pre-spawn hook in jupyterhub_config.py
- Create a templates directory and populate it with Jinja templates to create a new login page
- Modify the style.min.css file to apply styling to the login page
1. Create a repo on github.com with the assignments
On github.com, create a new repo with the notes and assignments for the quarter.

On a local computer, not the server, clone the github repo. This allows us to work on the notes and assignments locally.
# local computer
$ mkdir ENGR101
$ cd ENGR101
$ git init
$ git remote add origin https://github.com/ProfessorKazarinoff/ENGR101.git
$ git pull origin master
On the local computer, not the server, build the assignment and notes for the quarter. I did this using jupyter notebooks. Then add, commit and push the changes up to github.
# local computer
$ git add .
$ commit -m "added assignments and notes"
$ git push origin master
2. Add a pre-spawn hook in jupyterhub_config.py
Now we can go to the server and have the notebooks we created (and pushed up to github) pre-populate each users directory tree when they log into JupyterHub.
We'll use a Python package called gitpython to help with pulling the notebooks down from github.com. Log into the server and install gitpython using conda:
# on the server
$ sudo apt-get update
$ conda install -c conda-forge gitpython
Now we need to modify the jupyterhub_config.py file to do a couple things: Run a pre-spawn hook function that runs before each user's jupyter notebook server is started and pull the assignments and notes down from github as part of the pre-spawn hook function.
The pre-spawn hook function gets called every time a user logs into JupyterHub. This pre-spawn hook will run before the user's jupyter notebook server is created. In the pre-spawn hook, we want to check to see if the user has the assignments and notes pulled down from github already loaded. If the user doesn't have the assignments, then we want to pull the assignments down from github and put them in the user's directory tree.
So first we need a function that will pull the repo down from github. Note the line uid = getpwnam(user).pw_uid and gid = getpwnam(user).pw_gid in the function below. These lines of code get the user's numerical unix user id and group id. The userid and group id are needed to assign the proper permissions to the files we pull down from github.
When I first built the function, changing file permissions was not included. I could log onto jupterhub and see the notebooks pulled down from github, but I couldn't run or edit them. The problem was that the notebooks were pulled down from github by a sudo user and the jupyterhub user didn't have the permissions to write or execute any of the files. Building the permissions into the function with shutil.chown() solved the problem.
# in jupyterhub_config.py

def clone_repo(user, git_url, repo_dir):
    """
    A function to clone a github repo into a specific directory of a user.
    """
    Repo.clone_from(git_url, repo_dir)
    uid = getpwnam(user).pw_uid
    gid = getpwnam(user).pw_gid
    for root, dirs, files in os.walk(repo_dir):
        for d in dirs:
            shutil.chown(os.path.join(root, d), user=uid, group=gid)
        for f in files:
            shutil.chown(os.path.join(root, f), user=uid, group=gid)
Now we'll build a pre-spawn hook function that will run when the spawner starts. The function will call the clone_repo() function and pull down the assignments from the github repo the first time a user logs into JupyterHub. After the assignments and notes are initially created, each subsequent time the user logs into JupyterHub, a new fresh set of assignments and notes are pulled down if ERASE_DIR is set to True. If ERASE_DIR is set to False, once the assignments and notes are downloaded, they will not be over-written.
To run the pre-spawn hook function and the pull repo function, we need to make sure the following imports are present in our jupyterhub_config.py file:
# jupyterhub_config.py

import git, os, shutil
from pwd import getpwnam
The complete pre-spawn hook function is below:
# in jupyterhub_config.py

def create_dir_hook(spawner):
    """
    A function to clone a github repo into a specific directory of a
   JupyterHub user when the server spawns a new notebook instance.
    """
    username = spawner.user.name
    DIR_NAME = os.path.join("/home", username)
    git_url = "https://github.com/ProfessorKazarinoff/ENGR101.git"
    repo_dir = os.path.join(DIR_NAME, 'notebooks')

    if ERASE_DIR == True:
        if os.path.isdir(repo_dir):
            shutil.rmtree(repo_dir)
        os.mkdir(repo_dir)
        clone_repo(username, git_url, repo_dir)

    if ERASE_DIR == False and not (os.path.isdir(repo_dir)):
        os.mkdir(repo_dir)
        clone_repo(username, git_url, repo_dir)

    if ERASE_DIR == False and os.path.isdir(repo_dir):
        pass
The two functions need to be pasted into the jupyterhub_config.py file. Make sure the imports are present as well as an ERASE_DIR = True or ERASE_DIR = False line in the jupyterhub_config.py file too.
Next we need to add a pre-spawn hook function to the spawner object in our jupyterhub_config.py file in the form of
# in jupyterhub_config.py

c.Spawner.pre_spawn_hook = create_dir_hook
With these changes complete, we can restart jupyterhub using:
$ sudo systemctl stop jupyterhub
$ sudo systemctl start jupyterhub
$ sudo systemctl status jupyterhub
To exit the status screen use [Ctrl] + [c]
3. Create a templates directory and populate it with Jinja templates to create a new login page
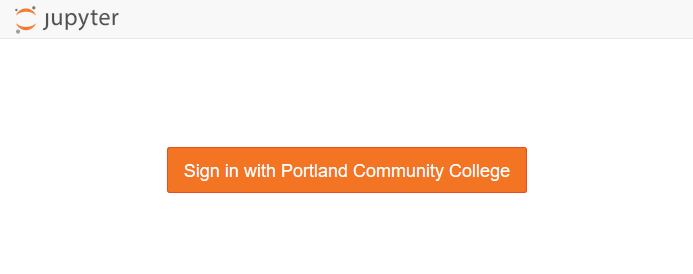
The JupyterHub login page looks like this:
But our college login page looks lik this:
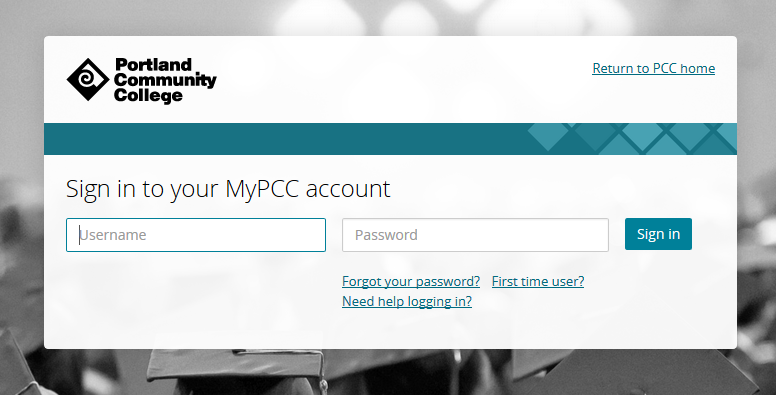
For users to feel comfortable with logging into the JupyterHub server, we'll make the JupyterHub login page look more like the college login page.
This was a time consuming and fussy task. It involved a lot of messing around with css and html.
First a set of custom jinja templates need to be created. When JupyterHub runs, there is a set directory of jinja templates that build the html users see when they go to the site. These jinga templates are burried deep in the JupyterHub package code. For my JupyterHub installation on the server, I found the jinja template files in the /pkgs directory in anaconda3. If you are using a virtual environment, the JupyterHub package directory name will likey be different:
/home/peter/anaconda3/pkgs/jupyterhub-0.8.1-py36_0/share/jupyter/hub/templates/
├── 404.html
├── admin.html
├── error.html
├── home.html
├── login.html
├── logout.html
├── page.html
├── spawn.html
├── spawn_pending.html
└── token.html
Now we need to copy these templates into our home directory. Once copied, we can modify the templates and create a new JupyterHub login page. The login.html file is the one that needs to be customized.
$ cd /home/peter/anaconda3/pkgs/jupyterhub-0.8.1-py36_0/share/jupyter/hub/
$ cp -R templates /home/peter/templates/
$ cd ~
$ cd templates
$ ls
Open up the login.html file and modify it with any html that you want to show up when a user goes to the jupyter hub site.
I messed around for WAY to long trying to get my custom login page to look like the college login page. An important piece of html that needs to stay in the login.html file is the <a> tag that links to the authentication url. The complete tag is detailed below
<!–– login.html ––>

<a role="button" class="btn btn-jupyter btn-lg" href="/hub/oauth_login?next=">
    Sign in with Portland Community College
</a>
I also kept in the jinga tag at the top of the file that brings in all of the formatting from login.html's parent template page.html
<!–– login.html ––>

{% extends "page.html" %}
All the changes I made to the login template were inside the "login" block of login.html. You can find my complete login.html file here
{% block login %}

<!–– make changes here ––>

{% endblock login %}
Now we need to modify the jupyterhub_config.py file so that our new set of custom jinja templates are used instead of the default jinja templates.
A problem I initially had was I set the directory path of the custom templates as /home/peter/templates and the login page didn't work as expected. When I changed the directory path to /home/peter/templates/ the problem was resolved.
# jupyterhub_config.py

# sets a custom html template at the login screen.
c.JupyterHub.template_paths = ['/home/peter/templates/']
4. Modify the style.min.css file to apply styling to the login page
Finally the style.min.css file needs to be modified so that the login page styling looks a little more like the college login page.
This is another thing I messed around with for a long time, a WAY to long time. I couldn't figure out a way to get JupyterHub to use a custom .css file. I tried creating a .css file in the new custom templates directory, but JupyterHub wouldn't copy it as a static asset when the server launched. I also tried putting a separate .css file deep inside of the JupyterHub package code. When the server ran, it seemed to copy the custom .css file (I could see the custom .css file using chrome's inspect element tool). But for some reason the custom .css file would be blank when server serve was running, even though the custom .css file contained a whole bunch of css code when viewed deep in the JupyterHub package code.
The solution I finally got to work was modifying the style.min.css file itself that JupyterHub uses. This file is buried deep in the JupyterHub package code:
home/peter/anaconda3/pkgs/jupyterhub-0.8.1-py36_0/share/jupyter/hub/static/css/
├── style.min.css
└── style.min.css.map
Modify the style.min.css file to include all the custom css styling desired (find my complete css file here) With changes to the login.html file and style.min.css file complete, we can restart JupyterHub and view the changes rendered on the login page.
$ sudo systemctl stop jupyterhub
$ sudo systemctl start jupyterhub
$ sudo systemctl status jupyterhub
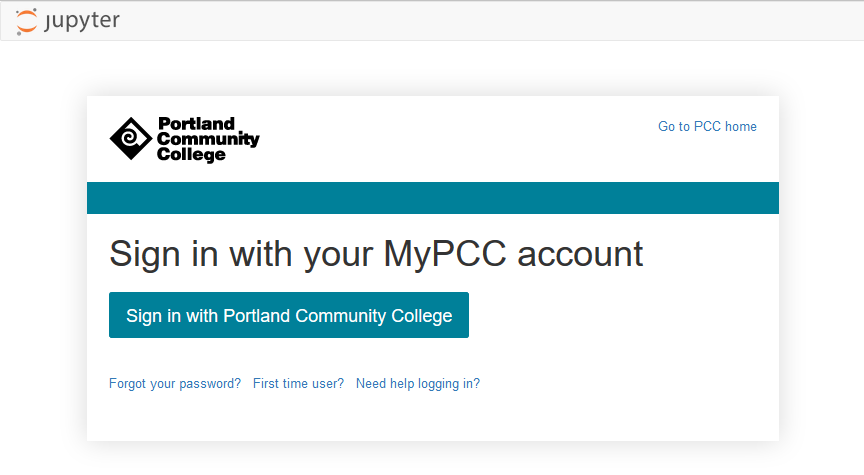
Below is the look of my modified login page in all it's custom html and css glory
Summary
In this post, we will built a pre-spawn hook that pulls down notes and assignments from github and adds it to each user's directory tree when their jupyter notebook server starts. We also constructed a custom login page by creating a custom jinja template (login.html) and modified the style.min.css file inside the JupyterHub package code. The resulting custom login pages looks a lot more like our college login page.
Conclusion
This concludes the Jupyter Hub series. We accomplished a lot to get a working version of Jupyter Hub up and running on a Digital Ocean server. Our Jupyter Hub deployment has the following features:
- Users don't need to install anything to edit and run Python code. Users just need a web browser and an internet connection.
- All users have a common set of installed Python packages and don't need to install any extra packages
- A custom domain name is hooked to JupyterHub instead of a numeric IP address
- JupyterHub runs on https and has SSL security
- Users can log into JupyterHub using their college usernames and passwords
- Each user's directory tree is pre-populated with assignments and notes pulled down from github
- The pre-populated assignments and notes can be run and modified by users.
You can find the notes and assignments that pre-poplulate into each user's directory tree here
You can find the various files that are part of the JupyterHub deployment here
I Hope this series is helpful to anyone who wants to set up Jupyter Hub for their own class or team. After the course runs, I want to post the results of students using Jupyter Hub. The first course to use Jupyter Hub runs this summer quarter.