This is the fifth part of a multi-part series that shows how to set up Jupyter Hub for a college class. In this post, we are going to link a domain name to our server IP address, add SSL security and configure nginx to run as a proxy in between users and jupyterhub. Then we'll run jupyterhub over https using the SSL security we created.
Posts in this series
- Why Jupyter Hub?
- Create ssh key, save to documents/ssh-keys
- Create a new Digital Ocean Droplet with a non-root sudo user
- Install Jupyter Hub on the server
- Apply SSL, link a domain name to the server and configure nginx (this post)
- Connect OAuth to Jupyter Hub
- Connect to Jupyter Hub as student
Last time
In the last post, we installed Anaconda on the server using a shell script. Then we installed some extra Python packages such as pint, pyserial and schemdraw to our base conda environment. Next we installed jupyterhub, opened up port 8000 and ran jupyterhub for the first time! And remember we shut down jupyter hub very quickly because we ran it without any SSL security.
Steps in this post:
- Link domain name to server IP address
- Install nginx and modify ufw
- Obtain SSL certificates with certbot
- Create a cookie secret and a proxy auth token
- Modify nginx config
- Generate jupyterhub_config.py and modify
- Restart nginx and start jupyterhub, see if we can login
- Create an new user and restart jupyterhub. See if the new user can log in.
1. Link domain name to server IP address
When we started Jupyter Hub in the previous post, it ran, we could log in, and we could run Python code. What's not to like, right? Well, security is the big problem.
In the initial setup, Jupyter Hub was running under regular http, not https. With a web application that has usernames and passwords, like Jupyter Hub, having https and SSL security is best (or maybe manditory). In order to use https, we need to get an SSL certificate. And that SSL certificate should correspond to the domain name linked to our server. So the first step is getting the domain name and pointing it at Digital Ocean. The next step is linking the domain name to our Jupyter Hub server.
Google Domains
I purchased the domain problemsolvingwithpython.com from google domains. It costs $12/year which seems pretty reasonable and was easy to set up. After purchasing the domain, I added the Digital Ocean DNS servers as a set of custom name servers to my domain options on google domains.

To add a set of custom name servers, click the button with the two bars under the DNS header. This will bring up a page where you can enter in the Digital Ocean DNS servers. The name servers to add are:
ns1.digitalocean.com
ns2.digitalocean.com
ns3.digitalocean.com
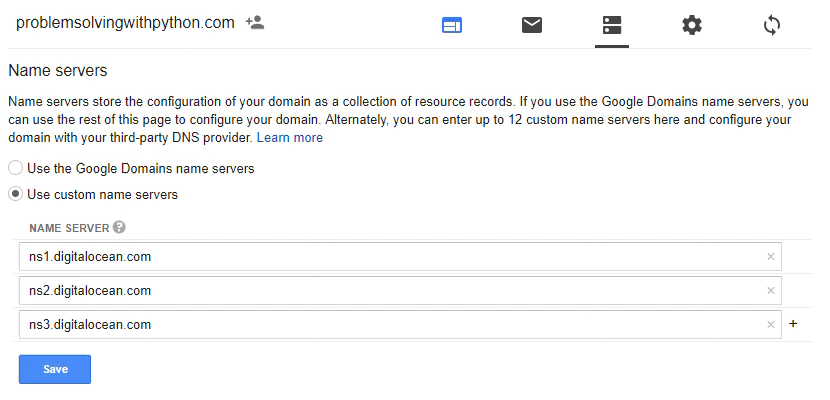
Make sure to click the radio button [Use custom name servers] and click [save].
Digital Ocean DNS
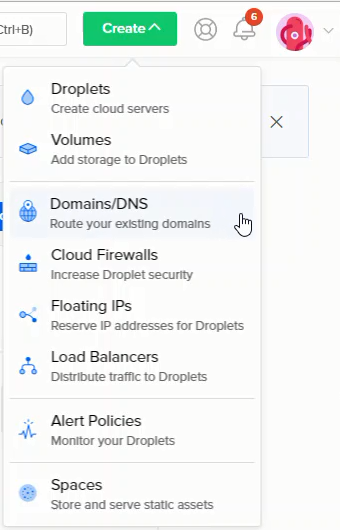
Now we are going to set our domain problemsolvingwithpython.com to link to the IP address of our server on Digital Ocean. Log into Digital Ocean and in the upper right select [Create] → [Domains/DNS]
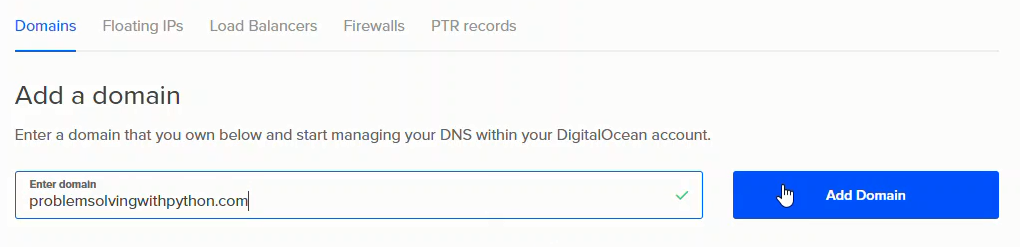
In the [Add a domain] field, type in the domain name without http, but including .com (or .edu/.org/.net) then click [Add Domain].
This will bring up a panel where we can add a DNS record. I want the notebook server to have the web address
https://notebooks.problemsovlingwithpython.com
So I entered notebooks in the text field. Then selected the droplet (server) that the web address will to route to.

After completing this step, there will be a number of new DNS records. The ones I set up are below:

It takes a couple minutes for the DNS switchover to complete. https://www.whatsmydns.net can be used to check the NS and A records of your domain and see if the domain name is getting through. The first time I set up DNS on Digital Ocean, I added the custom DNS servers to google domains but neglected to select the [use custom name servers] radio button on the google domains dashboard. It looked like the domain was routing to Digital Ocean, but actually the domain was just staying with google. Once I clicked the [use custom name servers] radio button and waited a couple minutes, the change over happened. It did take a bit of time though; not hours, but more than a few minutes.
2. Install nginx and modify ufw
Now that the domain name is set up, the next step is to install and configure nginx. Nginx is an open source web server that can handle many concurrent web connections at the same time. For the nginx installation, I followed this tutorial from Digital Ocean.
Use PuTTY to connect to the server with the non-root sudo user we set up before. Once logged in, we can update the system and install nginx.
$ sudo apt-get update
$ sudo apt-get install nginx
Digital Ocean installs a firewall application called ufw. Check out which apps the ufw firewall can work with:
$ sudo ufw app list
We see a list of available ufw configurations to work with nginx.
Available applications:
  Nginx Full
  Nginx HTTP
  Nginx HTTPS
  OpenSSH
We want to allow in both http and https requests. Once a http request comes in, we'll use nginx to convert the http connection to a https connection. Select nginx full. Note the Capitalization in the command:
$ sudo ufw allow 'Nginx Full'
We can check out which ports ufw is allowing through with:
$ sudo ufw status
Note in the output how ufw is allowing nginx full and requests over port 8000. We opened port 8000 earlier, so we could see how jupyterhub works without a domain name or SSL. Once we get nginx running and hooked up to jupyterhub, we need to remember to close off port 8000 in ufw.
Status: active

To                         Action      From
--                         ------      ----
22                         LIMIT       Anywhere
2375/tcp                   ALLOW       Anywhere
2376/tcp                   ALLOW       Anywhere
8000                       ALLOW       Anywhere
Nginx Full                 ALLOW       Anywhere
22 (v6)                    LIMIT       Anywhere (v6)
2375/tcp (v6)              ALLOW       Anywhere (v6)
2376/tcp (v6)              ALLOW       Anywhere (v6)
8000 (v6)                  ALLOW       Anywhere (v6)
Nginx Full (v6)            ALLOW       Anywhere (v6)
Nginx will start running as soon at it is installed. We can see the status with:
$ sudo systemctl status nginx
In the output, we should see something like below. This mean nginx is running. Key in [ctrl-c] to exit the status dashboard.
Active: active (running) since Thu 2018-05-17 04:51:16 UTC; 15min ago
Main PID: 17126 (nginx)
  CGroup: /system.slice/nginx.service
    ├── 17126 nginx: master process /usr/sbin/nginx -g daemon on; master_pr
    └── 17127 nginx: worker process
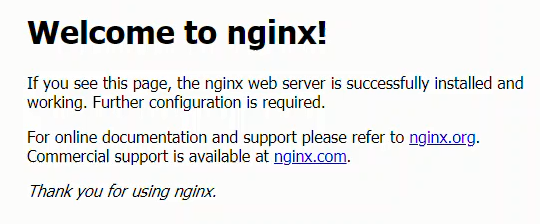
Now we can browse over to the domain (the domain we set up with Digital Ocean and google domains) and see the nginx start page.
3. Obtain SSL certificates with certbot
With a domain name hooked up to our server, we'll now able to obtain an SSL certificate. I followed this presentation to install certbot, a program used to generate SSL certificates.
$ cd ~
$ mkdir certbot
$ cd certbot
$ wget https://dl.eff.org/certbot-auto
$ chmod a+x certbot-auto
Before we can run certbot, we need to turn off nginx. When I first tried to run certbot, I was thrown an error:
Problem binding to port 80: Could not bind to IPv4 or IPv6.
Since we installed nginx earlier, and we confirmed that it's running, that means that port 80 is currently in use by nginx. We need to open up port 80 to certbot by temporarily shutting down nginx. Once nginx is stopped, we can run certbot and get our SSL certificate. We'll eventually have to restart nginx, but this can wait until after we change the nginx configuration file. If you are following along, make sure to change notebooks.problemsolvingwithpython.com to your domain.
$ sudo systemctl stop nginx
$ sudo systemctl status nginx
# [Ctrl] + [c] to exit
$ ./certbot-auto certonly --standalone -d notebooks.problemsolvingwithpython.com
If it worked and we got our SSL certificate, the output will be something like:
IMPORTANT NOTES:
 - Congratulations! Your certificate and chain have been saved at:
   /etc/letsencrypt/live/notebooks.problemsolvingwithpython.com/fullchain.pem
   Your key file has been saved at:
   /etc/letsencrypt/live/notebooks.problemsolvingwithpython.com/privkey.pem
   Your cert will expire on 2018-08-15.
Note the location of the fullchain.pem and privkey.pem files. We'll need to put these locations into the nginx configuration.
We also need to allow nginx to access these files. I had trouble getting nginx to run and this presentation showed a way to give nginx access to the SSL key files. There is probably a more "Linuxy" way of giving nginx access to the cert files, but I messed around with the permission settings for a while, and this way worked.
$ cd /etc/letsencrypt
$ ls
accounts  archive  csr  keys  live  renewal  renewal-hooks
$ sudo chmod 777 -R archive/
$ sudo chmod 777 -R live/
4. Create a cookie secret and a proxy auth token
In addition to the SSL certificate, the Jupyter Hub docs on security basics specify that a cookie secret and poxy auth token should be created. To create the cookie secret:
$ cd /srv
$ mkdir jupyterhub
$ cd jupyterhub
$ sudo touch jupyterhub_cookie_secret
$ sudo chown :sudo jupyterhub_cookie_secret
$ sudo chmod g+rw jupyterhub_cookie_secret
$ sudo openssl rand -hex 32 > jupyterhub_cookie_secret
$ ls
jupyterhub_cookie_secret
$ sudo chmod 600 jupyterhub_cookie_secret
$ ls -l
-rw------- 1 root sudo 65 Sep 14 17:41 jupyterhub_cookie_secret
I had trouble with the cookie secret file because I missed where the jupyterhub docs show:
The file must not be readable by group or other or the server won’t start. The recommended permissions for the cookie secret file are 600 (owner-only rw).
Now we have a cookie secret file. We need to make note of the location because we'll add this location to the jupyterhub_config.py file later.
To generate the proxy auth token, we can use the same set of commands, but point to a different file.
$ pwd
# should be in /srv/jupyterhub
$ sudo touch proxy_auth_token
$ sudo chown :sudo proxy_auth_token
$ sudo chmod g+rw proxy_auth_token
$ sudo openssl rand -hex 32 > proxy_auth_token
$ ls
jupyterhub_cookie_secret  proxy_auth_token
$ sudo chmod 600 proxy_auth_token
$ ls -l
-rw------- 1 root sudo 65 Sep 14 17:41 jupyterhub_cookie_secret
-rw------- 1 root sudo 65 Sep 14 17:47 proxy_auth_token
Now if we list the contents of ~/srv/jupyterhub we should see:
/srv/jupyterhub/
├── jupyterhub_cookie_secret
└── proxy_auth_token
Also we can generate a dhparam.pem file. I'm not exactly sure what the dhparam.pem file is, but I think it's good for security. First we need to cd into the /srv/jupyterhub directory. Next touch a new file called dhparam.pem. After that we can use chown and chmod to be able to write to the dhparams.pem file. The openssl dhparam command is used to generate the .pem file. Finally we modify the permissions again to 600 (owner-only rw). Note the location of this file as we will add it to the nginx config file.
$ cd /srv/jupyterhub
$ sudo touch dhparam.pem
$ sudo chown :sudo dhparam.pem
$ sudo chmod g+rw dhparam.pem
$ sudo openssl dhparam -out /srv/jupyterhub/dhparam.pem 2048
$ sudo chmod 600 dhparam.pem
$ ls -l
-rw------- 1 root sudo 424 Sep 14 17:59 dhparam.pem
-rw------- 1 root sudo  65 Sep 14 17:41 jupyterhub_cookie_secret
-rw------- 1 root sudo  65 Sep 14 17:47 proxy_auth_token
5. Modify nginx config
The next step is to modify the nginx config file so that nginx uses our SSL certificates and routes requests on to jupyterhub. This was the hardest part for me when I set up the first server. The nginx config file isn't Python code or a bash script. I went through many different configurations until I got one that worked.
The big initial problem was that I copied the sample nginx config that's up on the Jupyter Hub docs. But the nginx config posted on the jupyterhub docs is not a complete nginx config, it contains just the server portion. I didn't know that the whole server portion needed to be enclosed in another frame.
To modify nginx.conf, cd into the /etc/nginx directory. The nginx.conf file should be there along with a couple other files and directories.
$ cd /etc/nginx
$ ls
conf.d          koi-utf     nginx.conf    sites-available  ssl
fastcgi.conf    koi-win     proxy_params  sites-enabled    uwsgi_params
fastcgi_params  mime.types  scgi_params   snippets         win-utf
$ sudo nano nginx.conf
The nginx config that eventually worked for me is below. It can also be found here:
Note the line which shows the path to the SSL certificates. This will change based on your domain and where certbot saved the .pem files to.
## Based on: https://github.com/calpolydatascience/jupyterhub-deploy-data301/blob/master/roles/nginx/templates/nginx.conf.j2

user www-data;
worker_processes 4;
pid /run/nginx.pid;

events {
        worker_connections 1024;
        # multi_accept on;
}

http {
        include /etc/nginx/mime.types;

        default_type application/octet-stream;

    #top-level http config for websocket headers
    # from https://github.com/jupyterhub/jupyterhub/blob/master/docs/source/referen$
    map $http_upgrade $connection_upgrade {
        default upgrade;
            ''      close;
    }


    # All regular http requests on port 80 become SSL/HTTPS requests on port 32
    server {
        listen 80;
        server_name notebooks.problemsolving101withpython.com;

        # Tell all requests to port 80 to be 302 redirected to HTTPS
        return 302 https://$host$request_uri;
    }

    server {
        #listen 443 ssl default_server;
        listen 443;
        ssl on;
        server_name notebooks.problemsovling101withpython.com;

        ## SSL Protocals
        ssl_certificate /etc/letsencrypt/live/notebooks.problemsolving101withpython.com/fullchain.pem;
        ssl_certificate_key /etc/letsencrypt/live/notebooks.problemsolving101withpython.com/privkey.pem;

        ssl_protocols TLSv1 TLSv1.1 TLSv1.2;
        ssl_prefer_server_ciphers on;
        ssl_dhparam /srv/jupyterhub/dhparam.pem;

        # Make site accessible from http://localhost/
        #server_name localhost;

        # certs sent to the client in SERVER HELLO are concatenated in
        ssl_session_timeout 1d;
        ssl_session_cache shared:SSL:50m;
        ssl_stapling on;
        ssl_stapling_verify on;

        # modern configuration. tweak to your needs.
        ssl_ciphers 'ECDHE-ECDSA-AES256-GCM-SHA384:ECDHE-RSA-AES256-GCM-SHA384:ECDHE-ECDSA-CHACHA20-POLY1305:ECDHE-RSA-CHACHA20-POLY1305:ECDHE-ECDSA-AES128-GCM-SHA256:ECDHE-ECDSA-AES256-SHA384:ECDHE-RSA-AES256-SHA384:ECDHE-ECDSA-AES128-SHA256:ECDHE-RSA-AES128-SHA256';

        # HSTS (ngx_http_headers_module is required) (15768000 seconds = 6 months)
        add_header Strict-Transport-Security max-age=15768000;

        location / {
            proxy_pass http://127.0.0.1:8000;
            proxy_set_header X-Real-IP $remote_addr;
            proxy_set_header Host $host;
            proxy_set_header X-Forwarded-For $proxy_add_x_forwarded_for;
            proxy_set_header X-NginX-Proxy true;

            #proxy_http_version 1.1;
            proxy_set_header Upgrade $http_upgrade;
            proxy_set_header Connection "upgrade";
        }

        location ~ /.well-known {
            allow all;
        }
    }
}
Save and exit with [Ctrl] + [c] and [y]
6. Generate jupyterhub_config.py and modify
Next, we'll generate a jupyterhub_config.py file and modify it a little bit.
$ cd ~
$ jupyterhub --generate-config
Now we'll modify the jupyterhub_config.py file to allow local spawners and include our user peter as an admin user:
$ nano jupyterhub_config.py
There will be a lot of commented out text in the file. At the top of the file, add the following:
#jupyterhub_config.py

import os
c = get_config()
c.JupyterHub.log_level = 10
c.Spawner.cmd = '/home/peter/anaconda3/bin/jupyterhub-singleuser'

# Cookie Secret Files
c.JupyterHub.cookie_secret_file = '/srv/jupyterhub/jupyterhub_cookie_secret'
c.ConfigurableHTTPProxy.auth_token = '/srv/jupyterhub/proxy_auth_token'

c.Authenticator.whitelist = {'peter'}
c.Authenticator.admin_users = {'peter'}
7. Restart nginx and start jupyterhub, see if we can login
Now we'll restart nginx and start jupyterhub. Not that this time when we start jupyter hub we don't need to use the --no-ssl flag because we have SSL running on nginx. If it seems like nginx isn't working, try $ sudo systemctl status nginx and see if nginx really started. If it didn't, try the command nginx -t. This will print out any error messages if nginx failed to start. I had to do this many different times before I got nginx to work.
$ sudo systemctl stop nginx
$ sudo systemctl start nginx
$ sudo systemctl status nginx
# [ctrl-c] to exit
Restart the jupyterhub without the --no-ssl flag.
$ cd ~
$ jupyterhub
Log in with the non-root sudo username and password (same user that's running the PuTTY session). Now we can browse to our domain and see Jupyter Hub running in its full SSL glory.
8. Create an new user and restart jupyterhub. See if the new user can log in.
OK, it's all well and good that we can log into jupyterhub. But the purpose of setting of this up is for multiple students to be able to log into jupyterhub. If jupyterhub is still running, it can be stopped with [Ctrl] + [c]. Let's create a new user and see if we can log in as her.
$ sudo adduser kendra
Go through the prompts and remember the UNIX password. Now we'll modify jupyterhub_conf.py to include our new user kendra and add peter (our non-root sudo user) as an administrator:
c.Authenticator.whitelist = {'peter','kendra'}
c.Authenticator.admin_users = {'peter'}
Restart jupyterhub and try and login as kendra
$ jupyterhub
Amazing! right? Jupyter Hub running on our own domain using SSL security and https. Pretty cool.
Summary
In this post we created an SSL certificate with certbot. We modified the nginx config to use our SSL certificate and modified jupyterhub_config.py. At the end of all of that we were able to get a working version of jupyterhub running on https using SSL security and can log into jupyterhub as two different users.
Next Steps
Up next will add an authentication system so that users can log into our Jupyter Hub server using their college usernames and passwords. We will also set jupyterhub to run as a system service in the background which will allow us to work on the server and run jupyterhub at the same time.