In this post, we'll run through how to set up a single page flask app that shows a temperature pulled from ThingSpeak.com. ThingSpeak has nice looking graphs, but on ThingSpeak it is actually kind of hard to see the value of an individual data point. I want to be able to see the most recent temperature point recorded by my ESP8266 WiFi weather station project on a phone or tablet. By building a flask app and hosting it on Digital Ocean, I can now view the current temperature in a nice big font from anywhere.
Set up a new Digital Ocean Droplet
The flask app needs a server to run on. I choose Digital Ocean as my cloud server provider. Digital Ocean hosts virtual private servers that run in the cloud. Setting up a server on Digital Ocean is pretty cheap ($5/month) and quick. I host my Jupyter Hub server on Digital Ocean, so I am also more familiar with spinning up their servers compared to other cloud providers like Linode or AWS. I like their documentation. It is clear, concise and easy to follow.
To set up the server for the flask app, I created a new Droplet on Digital Ocean. After creating a new server, it is best practice to create a non-root sudo user.
Create a new Droplet
Our flask single page web app built with Python will be hosted on Digital Ocean.
To create a new cloud server, called a Droplet in DigitalOcean-speak, create an account on Digital Ocean. Once logged in select Create → Droplets in the upper right menu.
The Digital Ocean Droplet options I choose were:
- Ubuntu 18.04.1 x64
- Size: Memory 1G, SSD 25 GB, Transfer 1 TB, Price $5/mo
- Datacenter Region: San Fransisco 2
- Additional Options: None
- SSH keys: Added all of my saved SSH keys. You need this to log into the server with PuTTY!
Create the server with the big green [Create] button.
After the Droplet is created, note the IP address of the server. We'll need the IP address of the droplet for the next step.
Login to server with PuTTY
Our first interaction with the server is to log in as root. Then we'll create a non-root sudo user to interact with the server from then on out.
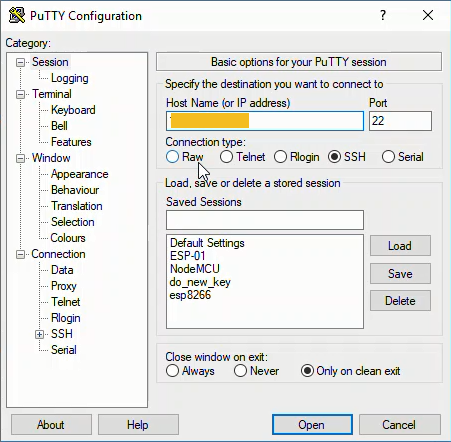
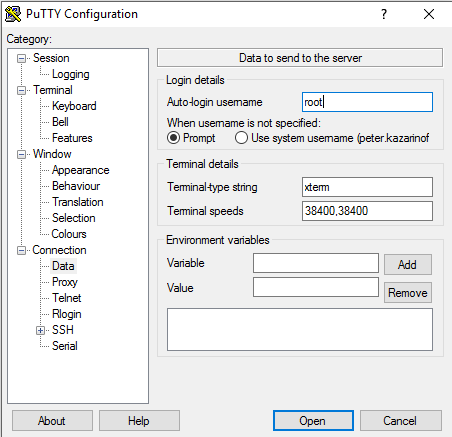
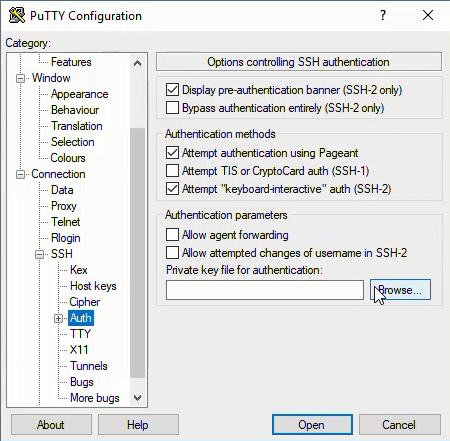
Open PuTTY and log onto the server as root. See a previous post on how to set up PuTTY on Windows 10. To log into the server as root, set the following in PuTYY:
- Hostname (or IP Address): The IP address of the server
- Port: 22
- Connection Type: SSH
- Connection:
- Data:
- Auto-login username: root
- Connection:
- SSH:
- Auth:
- Private keyfile for Authentication: your saved private SSH key
Create a non-root sudo user
I followed the Digital Ocean Initial Server Setup Tutorial to create a non-root sudo user. The commands entered into the PuTTY SSH terminal are below. Note you should change the username to something other than peter. Here and in the Digital Ocean tutorial, a hash symbol # is shown before the commands. The hash # symbol should not be typed, it just represents the fact we are operating as root.
# adduser peter
# usermod -aG sudo peter
# ufw allow OpenSSH
# ufw enable
Copy SSH keys to the non-root sudo user
Next we'll move the SSH keys stored in the root user's profile to the new sudo user's profile (in my case peter). I've had trouble moving SSH key files and setting permissions correctly in Linux. A Digital Ocean tutorial has a great line that copies the SSH Keys and sets the permissions correctly in one step. If you skip this step, you won't be able to log into the server as the new non-root sudo user you just created. Note you should change the user name from peter to whatever username you picked in the previous step.
# rsync --archive --chown=peter:peter ~/.ssh /home/peter
Now let's check if we can log into the server as the new user.
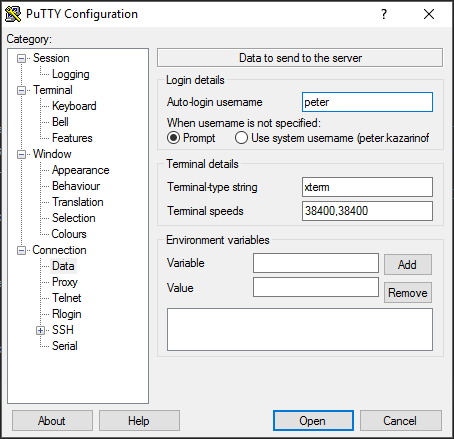
Exit the PuTTY window by typing exit at the prompt. Open up a new SSH session in PuTTY. Set Connection → Data → Auto-login username as the non-root sudo user. (I put peter in the Auto-login username box).
When the terminal window opens, you should see your username listed before the prompt. At the prompt, try the following command. Note the dollar sign $ does not need to be typed. The dollar sign $ is there to indicate the command prompt.
$ sudo -l
User peter may run the following commands on flask-app-server:
    (ALL : ALL) ALL
You can type the command exit to close the PuTTY terminal.
Acquire and configure a domain name
To use secure SSL connections and https with our flask single page app, we need a real domain name.
Purchase a domain name
I bought my domain name at Google Domains for $12/year. The price seems reasonable and Digital Ocean has a tutorial that shows how to connect a google domains to Digital Ocean DNS servers.
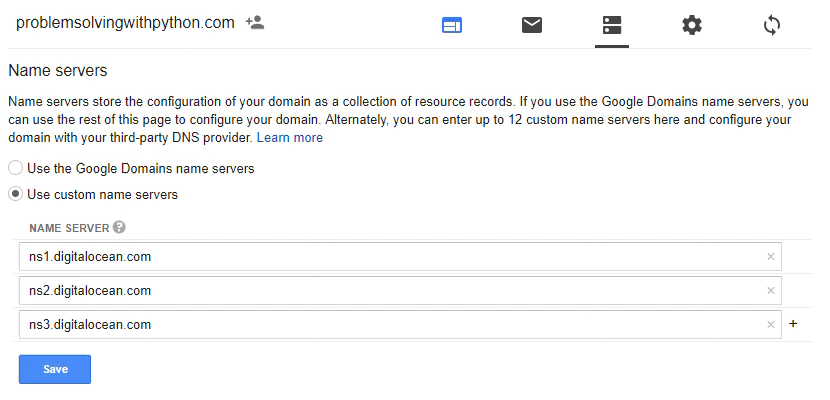
Point DNS severs at Digital Ocean
Once the domain is purchased, the domain's Name Server needs to be pointed at Digital Ocean.
Link the domain name to the server IP address
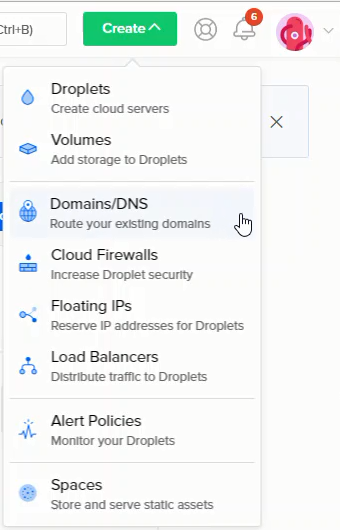
On Digital Ocean, login and click [Create] → [Domains/DNS]. Type in the newly purchased domain name in the box and click [Add Domain].
Link the new Domain to the Digital Ocean Droplet by typing in the @ symbol in the [HOSTNAME] box and selecting the new Droplet name in the [WILL DIRECT TO] drop down box. Click [Create Record] to link the domain name to the server. You can also link www in the [HOSTNAME] box and select the new Droplet in the [WILL DIRECT TO] dropdown box to link www.yourdomain.com to the server.
Build the Flask App
Now that the server is set up and the domain name is routed to the server, it's time to actually build the flask single page web app.
Install packages
Before the single page flask app can be built, a number of packages need to be installed on the server. I followed along with this tutorial from Digital Ocean.
Log onto the server with PuTTY and type the following commands:
$ sudo apt-get update
$ sudo apt-get upgrade
$ sudo apt-get install python3-pip
$ sudo apt-get install python3-dev
$ sudo apt-get install python3-setuptools
$ sudo apt-get install python3-venv
$ sudo apt-get install build-essential libssl-dev libffi-dev
Create a virtual environment and install flask
Once the necessary libraries are installed, I created a virtual environment to run the flask app. I usually use conda to create virtual environments (see this post), but since I'm not using the Anaconda distribution of Python for this flask app, venv will have to do instead.
$ cd ~
$ mkdir flaskapp
$ cd flaskapp
$ python3.6 -m venv flaskappenv
$ source flaskappenv/bin/activate
With the virtual environment created and activated, install wheel, flask, uwsgi and requests with pip. We'll use requests a little later to pull down temperature data from ThingSpeak.com. Note that (flaskappenv) is shown before the command prompt when the virtual environment is active. Make sure to only pip install within the (flaskappenv) virtual environment.
(flaskappenv)$ pip install wheel
(flaskappenv)$ pip install flask
(flaskappenv)$ pip install uwsgi
(flaskappenv)$ pip install requests
Build the first simple flask app
With the Python packages installed, next we'll build a very simple version of the flask app and viewed it in a web browser.
(flaskappenv)$ pwd
# ~/flaskapp
(flaskappenv)$ nano flaskapp.py
In the flaskapp.py file, I included the bare minimum flask app to test the server:
# flaskapp.py

from flask import Flask
app = Flask(__name__)

@app.route("/")
def index():
    return "<h1>The temperature is 91.2 F</h1>"

if __name__ == "__main__":
    app.run(host='0.0.0.0')
A note about editing code in the nano text editor thru PuTTY: You can paste into a PuTTY terminal window using the right mouse button. Selecting text in PuTTY copies the text to the clip board. Don't use [ctrl-c] or [ctrl-v] to copy and paste in PuTTY. Exit the nano text editor with [ctrl-x].
Testing the first simple flask app
With the first version of flaskapp.py complete, Let's run the flask app for the first time to test that everything is working properly.
To run the flask app, I had to make sure I was in the virtual environment built earlier. I also needed to allow port 5000 open on the ufw firewall. Port 5000 is the default port flask runs on.
(flaskappenv)$ sudo ufw allow 5000
(flaskappenv)$ python flaskapp.py
It works! By pointing a browser to the Droplet IP address followed by :5000, I can see the simple message: "The temperature is 91.2 F".
124.822.76.209:5000

Set up uWSGI and systemctl
There are going to be two layers between the flask app and the outside internet. Get requests from web browsers will first come into NGINX then go to uWSGI before being passed to flask.
Configuring uWSGI
We installed uWSGI earlier when we pip installed flask. Now uWSGI needs to be configured and tested. I followed the Digital Ocean tutorial closely for this step.
(flaskappenv)$ pwd
# ~/flaskapp
(flaskappenv)$ nano wsgi.py
In the wsgi.py file, include:
# wsgi.py

from flaskapp import app

if __name__ == "__main__":
    app.run()
Testing uWSGI
Next, let's test the configuration. uWSGI can be run from the command line with a couple flags:
(flaskappenv)$ uwsgi --socket 0.0.0.0:5000 --protocol=http -w wsgi:app
When I point a browser to the droplet IP address followed by :5000, I see the simple message again: "The temperature is 91.2 F". The flask app still seems to be working!

Construct the uWSGI configuration file
Now for another layer of uWSGI goodness- building a uWSGI .ini configuration file.
(flaskappenv)$ deactivate
$ pwd
# ~/flaskapp
$ nano flaskapp.ini
Inside the flaskapp.ini file, include the following:
[uwsgi]
module = wsgi:app

master = true
processes = 5

socket = flaskapp.sock
chmod-socket = 660
vacuum = true

die-on-term = true
Construct a systemd file
Because we want to have the flask app running all the time, let's create a systemd control file to get the flask app running as a system service on the server.
$ sudo nano /etc/systemd/system/flaskapp.service
In the flaskapp.service file, I included the following as described in the Digital Ocean tutorial. Note the username peter should be replaced with your non-root sudo user.
[Unit]
Description=uWSGI instance to serve flaskapp
After=network.target

[Service]
User=peter
Group=www-data
WorkingDirectory=/home/peter/flaskapp
Environment="PATH=/home/peter/flaskapp/flaskappenv/bin"
ExecStart=/home/peter/flaskapp/flaskappenv/bin/uwsgi --ini flaskapp.ini

[Install]
WantedBy=multi-user.target
Test with systemctl
After the flaskapp.service file is created, we need to reload the systemctl daemon before starting the flaskapp service.
$ sudo systemctl daemon-reload
$ sudo systemctl start flaskapp
$ sudo systemctl status flaskapp
The status call should show the service as active (running). Something like the message below.
flaskapp.service - uWSGI instance to serve flaskapp
   Loaded: loaded (/etc/systemd/system/flaskapp.service; disabled; vendor preset
   Active: active (running) since Wed 2018-09-12 18:09:15 UTC; 7s ago
Use [ctrl-c] to exit the status screen. [ctrl-c] will not stop the service.
Configure NGINX and apply SSL security
We'll use NGINX as a proxy server to work with uWSGI and the flask app. The general control flow resulting from GET request will be:
GET request → NGINX → uWSGI → flaskapp
Install NGINX
Before we can use NGINX, NGINX needs to be installed on the server. Installation is a simple apt-get command. Note that NGINX starts running as soon as it is installed.
$ sudo apt-get install nginx
Configure NGINX
To use NGINX as part of the web stack, we need to create a configuration file in the /etc/nginx/sites-available/ directory. The Digital Ocean tutorial was really helpful for this step. NGINX configuration was something I struggled with when I built my Jupyter Hub server .
$ sudo nano /etc/nginx/sites-available/flaskapp
Edit the flaskapp NGINX config file the /sites-available directory to include the following. Make sure to change the your_domain and www.your_domain fields:
server {
    listen 80;
    server_name your_domain wwww.your_domain;

    location / {
        include uwsgi_params;
        uwsgi_pass unix:/home/peter/flaskapp/flaskapp.sock;
    }
}
Now we'll link the NGINX config file to the /etc/nginx/sites-enabled directory and restart NGINX with the new configuration. If something doesn't look right on the systemctl status screen, you can check for problems with the command sudo nginx -t.
$ sudo ln -s /etc/nginx/sites-available/flaskapp /etc/nginx/sites-enabled
$ sudo systemctl restart nginx
$ sudo systemctl status nginx
#ctrl-c to exit
Now that NGINX and uWSGI are running, let's also shut off the :5000 development port.
$ sudo ufw delete allow 5000
$ sudo ufw allow 'Nginx Full'
Browse to the web address of the server. This time you won't need to append the address with :5000. Also the web address can be your domain name, not just the server IP address You should see the message: "The temperature is 91.2 F".
http://mydomain.com/

Apply SSL Security
One of the reasons for getting a real domain name is so the server can run with SSL security and https. Adding SSL can be done with certbot, a Python program that assists with generating SSL certificates. I followed the Digital Ocean tutorial steps to acquire the certificate. Make sure to replace your_domain with your actual domain name.
$ sudo add-apt-repository ppa:certbot/certbot
$ sudo apt install python-certbot-nginx
$ sudo certbot --nginx -d mydomain.com -d www.mydomain.com
As part of the certbot setup, I selected option 2.
2: Redirect - Make all requests redirect to secure HTTPS access. Choose this for
new sites, or if you're confident your site works on HTTPS. You can undo this
change by editing your web server's configuration.
If certbot is successful, you will see a message similar to this:
IMPORTANT NOTES:
 - Congratulations! Your certificate and chain have been saved at:
   /etc/letsencrypt/live/mydomain.com/fullchain.pem
   Your key file has been saved at:
   /etc/letsencrypt/live/mydomain.com/privkey.pem
 ```

Now we no longer need to run NGINX with HTTP, since we can now run NGINX with HTTPS. All the HTTP traffic will be forwarded to HTTPS.

```bash
$ sudo ufw delete allow 'Nginx Full'
$ sudo ufw allow 'Nginx HTTPS'
Add Bootstrap styling
The single page app is pretty basic right now. It also isn't designed to look good on phones or tablets. I plan on using my phone to view the flask app most of the time, so I decided to use bootstrap styling and the jumbotron component from bootstrap in the flask app.
To keep things simple, I used the bootstrap CDN instead of installing the whole bootstrap package to the server. On the bootstrap3 install page is the content we need to add to the top of our .html template.
To make the temperature display look nicer, I utilized the bootstrap jumbotron component. If you follow the link, you will see a couple lines of html that need to be included first in the <header> portion of the template.
To add the bootstrap styling I created a jinga template called index.html and placed a modified version of the html for the jumbotron component and bootstrap CDN inside. On the server, we need to create a templates directory to store the jinja template. <main_app>/templates is the default location for jinga templates when running flask.
$ cd ~/flaskapp
$ mkdir templates
$ cd templates
$ nano index.html
The index.html template contains a <header> with the bootstrap3 CDN and a <body> which contains the jumbotron component.
<!-- index.html -->
<!DOCTYPE html>
<html lang="en">
<head>
<meta charset="UTF-8">
<meta http-equiv="X-UA-Compatible" content="IE=edge">
<meta name="viewport" content="width=device-width, initial-scale=1">
<title>show temp</title>

<!-- Latest compiled and minified CSS -->
<link rel="stylesheet" href="https://maxcdn.bootstrapcdn.com/bootstrap/3.3.7/css/bootstrap.min.css" integrity="sha384-BVYiiSIFeK1dGmJRAkycuHAHRg32OmUcww7on3RYdg4Va+PmSTsz/K68vbdEjh4u" crossorigin="anonymous">

<!-- Optional theme -->
<link rel="stylesheet" href="https://maxcdn.bootstrapcdn.com/bootstrap/3.3.7/css/bootstrap-theme.min.css" integrity="sha384-rHyoN1iRsVXV4nD0JutlnGaslCJuC7uwjduW9SVrLvRYooPp2bWYgmgJQIXwl/Sp" crossorigin="anonymous">

<!-- Latest compiled and minified JavaScript -->
<script src="https://maxcdn.bootstrapcdn.com/bootstrap/3.3.7/js/bootstrap.min.js" integrity="sha384-Tc5IQib027qvyjSMfHjOMaLkfuWVxZxUPnCJA7l2mCWNIpG9mGCD8wGNIcPD7Txa" crossorigin="anonymous"></script>

</head>

<body>

<div class="container-fluid">
    <div class="jumbotron">
        <hr class="my-4">
        <h1 class="display-4"> 91.4 F</h1>
        <p class="lead">temperature inside</p>
        <hr class="my-4">
    </div>
</div>

</body>
</html>
Now we need to modify the flaskapp.py file to point to our index.html template. A new flask function, render_template() is used. render_template must be included in the imports and is used as the return action of the @app.route("/") index() function.
$ nano ~/flaskapp/flaskapp.py
The revised flaskapp.py file is below.
# flaskapp.py

from flask import Flask, render_template
app = Flask(__name__)

@app.route("/")
def index():
    return render_template("index.html")

if __name__ == "__main__":
    app.run(host='0.0.0.0')
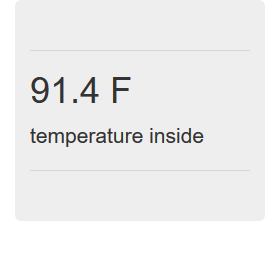
We can view our changes by reloading the flaskapp system service and browsing to the server domain's main page.
$ sudo systemctl stop flaskapp
$ sudo systemctl start flaskapp
$ sudo systemctl status flaskapp
# [ctrl-c] to exit
Pull the temperature from ThingSpeak.com with requests
The final step of this flask single page app project is to dynamically pull the temperature from ThingSpeak.com and show it as a web page.
Right now the flask app only shows the static temperature 91.4 F. However, the whole point of the app is to see the current temperatures the WiFi weather stations measure.
To grab the temperatures off of ThingSpeak.com, we'll use the requests package. According to the ThingSpeak.com web API documentation, the format of our GET request needs to be:
https://api.thingspeak.com/channels/<channel_id>/fields/<field_id>/last.<format>
<channel_id> corresponds to the channel number on ThingSpeak.com. My WiFi weather stations are on a public channel. <field_id> is the field number held by the ThingSpeak channel. Each ThingSpeak channel can have multiple fields. The temperature we care about is in field 1. The <format> we want is .txt. We could grab .json or a .csv off of ThingSpeak, but since we only need one temperature reading at a time, .txt is the easiest.
Let's try out the ThingSpeak web API using the Python REPL. Make sure requests is installed in the virtual environment before importing it. On the server try:
$ source ~/flaskapp/flaskappenv/bin/activate
(flaskappenv)$ python

>>> import requests
>>> r = requests.get('https://api.thingspeak.com/channels/266256/fields/2/last.txt')
>>> print(r.text)
-1
>>> exit()

(flaskappenv)$ deactivate
$
Now we need to use this same web API call shown above in the flask app. Modify flaskapp.py to include the requests package and include the web API request as a line the index() function. I also included a line to convert the temperature from °F to °C. When the temperature value comes in from ThingSpeak, it is a string. The temperature value needs to be converted to a float before the °C to °F conversion can be accomplished. After the conversion, the temperature in °F needs to be converted back to a string. A string is needed because the temperature in °F is passed to the render_template() function as the parameter temp will be used in a revised version of our jinja template index.html. The extra argument in the render_template() function transfers the variable temp_f from the flaskapp.py file to the jinja template index.html.
$ nano ~/flaskapp/flaskapp.py
The modified flaskapp.py script is below:
# flaskapp.py

from flask import Flask, render_template
import requests
app = Flask(__name__)

@app.route("/")
def index():
    r = requests.get('https://api.thingspeak.com/channels/254616/fields/1/last.txt')
    temp_c_in = r.text
    temp_f = str(round(((9.0 / 5.0) * float(temp_c_in) + 32), 1)) + ' F'
    return render_template("index.html", temp=temp_f)

if __name__ == "__main__":
    app.run(host='0.0.0.0')
Finally, we need to modify the index.html template and test the whole flask app. We passed a parameter temp from flaskapp.py to this template. The temp parameter can be used programmatically in the jinja index.html template. The value stored in temp will end up displayed on the working web page. Jinja templates use code blocks that start and end with double curly brackets {{ }}. Our temp parameter goes into one of these blocks.
$ cd ~/flaskapp/templates
$ nano index.html
The revised index.html file is below:
<!-- index.html -->
<!DOCTYPE html>
<html lang="en">
<head>
<meta charset="UTF-8">
<meta http-equiv="X-UA-Compatible" content="IE=edge">
<meta name="viewport" content="width=device-width, initial-scale=1">
<title>show temp</title>

<!-- Latest compiled and minified CSS -->
<link rel="stylesheet" href="https://maxcdn.bootstrapcdn.com/bootstrap/3.3.7/css/bootstrap.min.css" integrity="sha384-BVYiiSIFeK1dGmJRAkycuHAHRg32OmUcww7on3RYdg4Va+PmSTsz/K68vbdEjh4u" crossorigin="anonymous">

<!-- Optional theme -->
<link rel="stylesheet" href="https://maxcdn.bootstrapcdn.com/bootstrap/3.3.7/css/bootstrap-theme.min.css" integrity="sha384-rHyoN1iRsVXV4nD0JutlnGaslCJuC7uwjduW9SVrLvRYooPp2bWYgmgJQIXwl/Sp" crossorigin="anonymous">

<!-- Latest compiled and minified JavaScript -->
<script src="https://maxcdn.bootstrapcdn.com/bootstrap/3.3.7/js/bootstrap.min.js" integrity="sha384-Tc5IQib027qvyjSMfHjOMaLkfuWVxZxUPnCJA7l2mCWNIpG9mGCD8wGNIcPD7Txa" crossorigin="anonymous"></script>

</head>

<body>

<div class="container-fluid">
    <div class="jumbotron">
        <hr class="my-4">
        <h1 class="display-4"> {{ temp }} </h1>
        <p class="lead">temperature inside</p>
        <hr class="my-4">
    </div>
</div>

</body>
</html>
View the final flask app online
With the changes to readtemp.py and index.html complete, we can restart the flask app system service and view our app with a web browser.
$ sudo systemctl stop flaskapp
$ sudo systemctl start flaskapp
$ sudo systemctl status flaskapp
# [ctrl-c] to exit
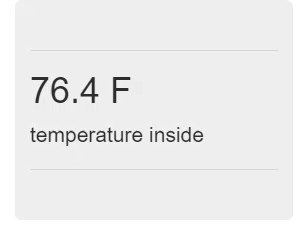
The final single page flask web app is complete!
If everything is working correctly, you should see the working app running on your domain looks like this.
Summary
It was a long process to construct this flask single page webapp project. A lot for technologies and languages were used.
An incomplete list is below:
- cloud servers
- DNS Servers
- Linux
- SSH and SSH keys
- PuTTY
- Python
- Flask
- systemd
- uWSGI
- NGINX
- SSL and certbot
- web API's
- jinja templates
- html
- bootstrap
That's a lot of stuff to go in one project.
The next thing I'm thinking about is building a flask IoT (internet of things) server that accepts GET requests from ESP8266 weather stations. ThingSpeak.com works great as an IoT sever, but there are limits to how often data can be posted and how often data can be accessed. I think writing my own IoT server in flask would be fun too!